← Back to blog # How to Use the Apify MCP in ChatGPT to Access LegalTech Legal Connectors
Learn how to use LegalTech legal connectors from a free ChatGPT account: enable Developer Mode, add the Apify MCP (@Apify), and query Fiscalía, CENDOJ, Hacienda, Property Registry, and more directly from the chat.
If you already use **Claude** with the Apify MCP to query doctrine and case law from the chat, this guide is the version for those who prefer working from **ChatGPT**. In a few steps you'll enable Developer Mode, add Apify as a connector, and be able to use the LegalTech legal actors (`legaltech/fiscalia`, `legaltech/cendoj`, `legaltech/hacienda`...) directly from the conversation, simply by typing `@Apify`.
## 🧩 What Is the Apify MCP and Why Connect It to ChatGPT?
The **Model Context Protocol (MCP)** lets an assistant like ChatGPT connect to external tools and run them for you during the conversation. By adding the Apify MCP as a connector, ChatGPT gains access to the entire LegalTech actor catalogue: instead of filling in forms and filters on official search engines, you simply ask ChatGPT in natural language for what you need, and it runs the search for you.
Let's go step by step.
### **Step 1: Enable Developer Mode**
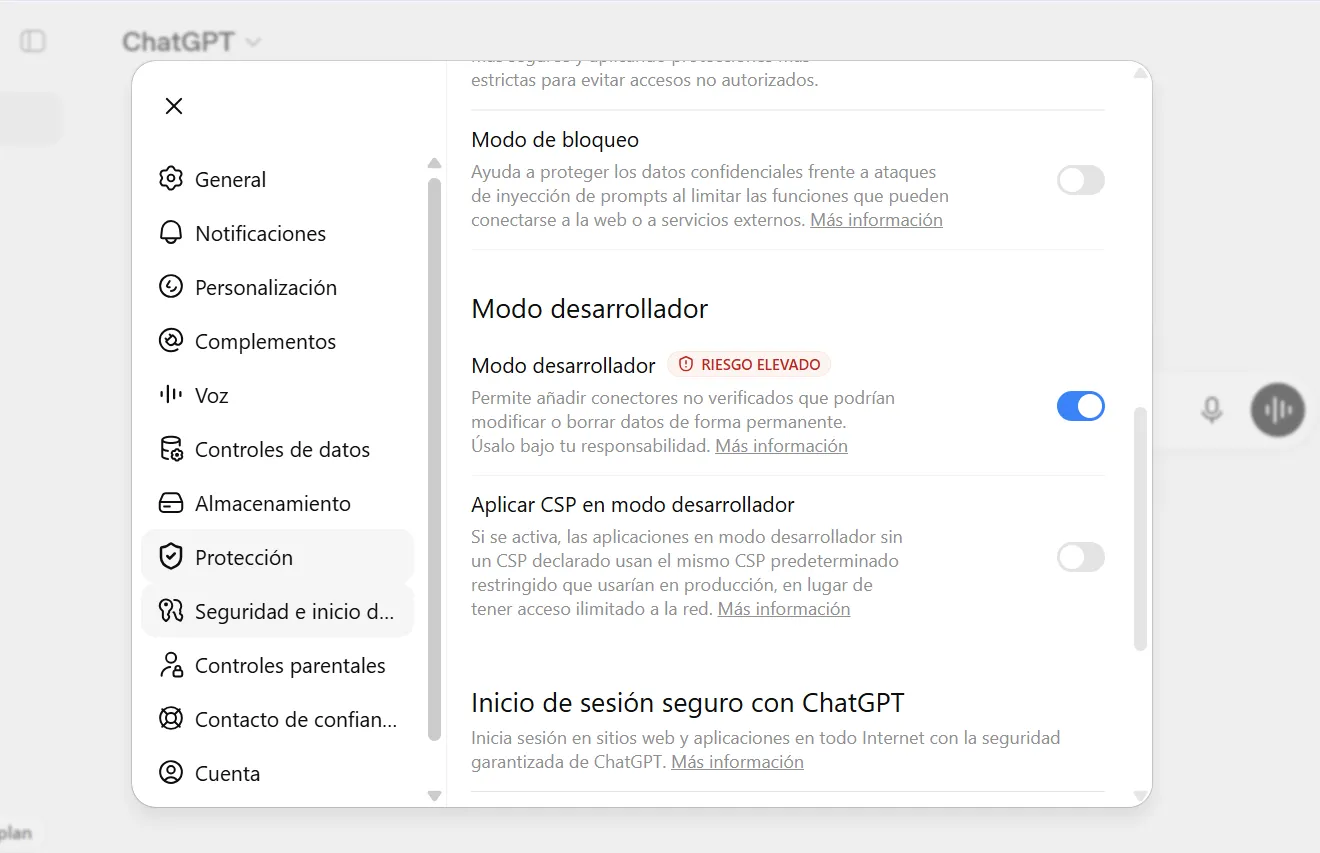
Custom connectors in ChatGPT (such as the Apify MCP) live behind a setting called **Developer Mode**, intended for connectors that have not yet been verified by OpenAI.
Go to [Settings → Security → Developer mode](https://chatgpt.com/#settings/Connectors/Advanced) and turn the toggle on.

> ⚠️ ChatGPT flags this setting as "high risk" because it allows you to add connectors that OpenAI hasn't verified. The Apify MCP (`https://mcp.apify.com/?tools=actors,docs,runs,storage,tasks,legaltech/cendoj,legaltech/hacienda,legaltech/tribunal-constitucional,legaltech/tjue,legaltech/fiscalia,legaltech/catastro,legaltech/ine,legaltech/aepd`) is Apify's official connector, so you can enable it with confidence for this use case.
### **Step 2: Add the Apify Connector**
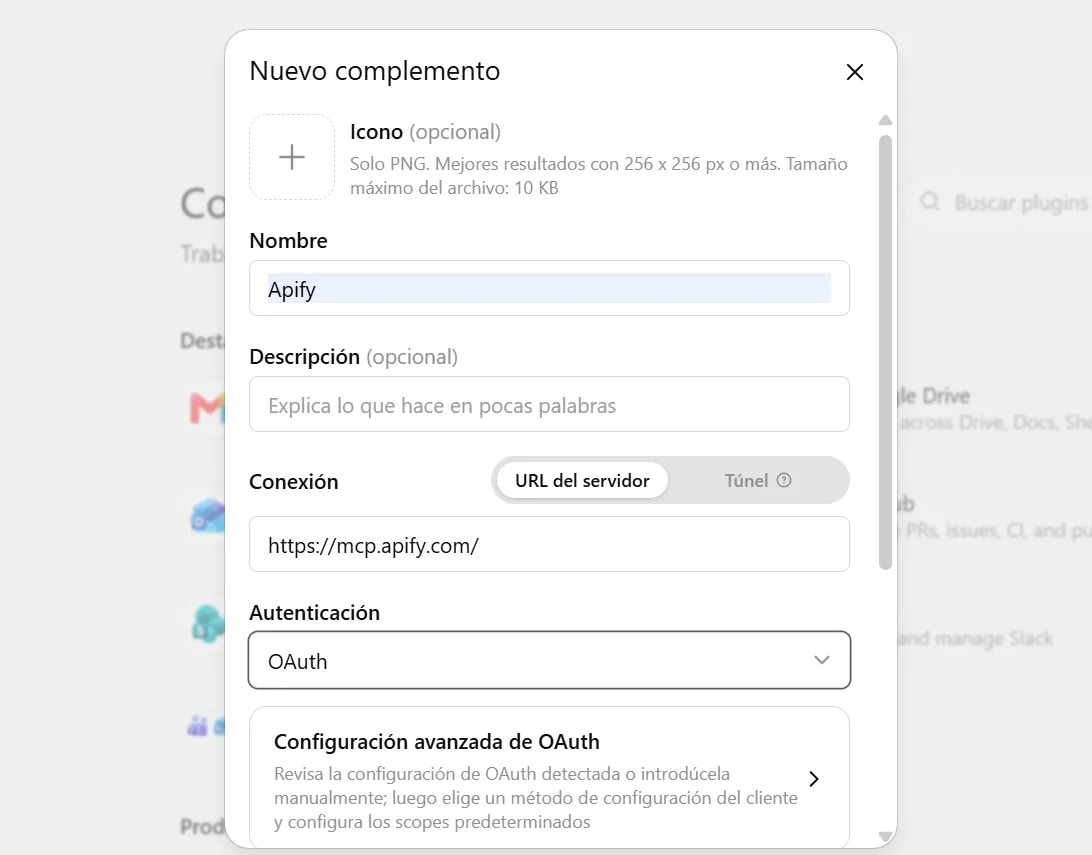
With Developer Mode on, go to [Connectors → Create connector](https://chatgpt.com/plugins#settings/Connectors?create-connector=true&redirectAfter=%2Fplugins) and fill in the form with these three values:
| Field | Value |
| --- | --- |
| **Name** | `Apify` |
| **MCP Server URL** | `https://mcp.apify.com/?tools=actors,docs,runs,storage,tasks,legaltech/cendoj,legaltech/hacienda,legaltech/tribunal-constitucional,legaltech/tjue,legaltech/fiscalia,legaltech/catastro,legaltech/ine,legaltech/aepd` |
| **Authentication** | `OAuth` |

Click **Create**.
### **Step 3: Create Your Apify Account Before Signing In**
When you click **Create**, ChatGPT will ask you to authorize the connection with Apify via OAuth. If you don't have an Apify account yet, this is the moment to create one — do it **before** clicking "Sign in with Apify" in the ChatGPT window, using the button below:
<br>
<a href="https://console.apify.com/sign-up?fpr=legaltech" target="_blank" rel="noopener noreferrer" style="display: inline-block; padding: 10px 20px; font-size: 16px; font-weight: bold; text-align: center; text-decoration: none; color: #ffffff; background-color: #6B46C1; border-radius: 8px;">
Create a free Apify account
</a>
<br>
Apify's free plan includes enough monthly usage credits to run the LegalTech legal actors. Once your account is created, go back to the ChatGPT window and click **Sign in with Apify** to authorize the connection with the account you just registered.
ChatGPT will show you the permissions you're about to grant — essentially, that Apify can run actors and return results inside your conversation. Accept to complete the connection.
### **Step 4: Use Apify from the Chat with @Apify**
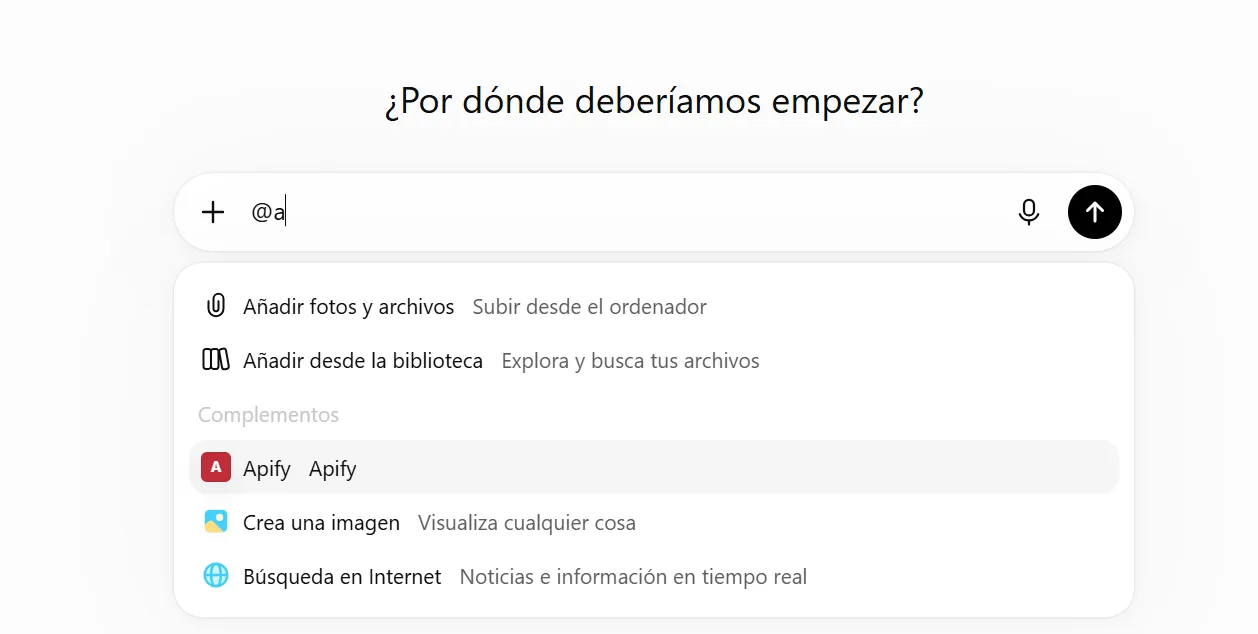
With the connector set up, open a new conversation, type `@`, and select **Apify** from the list of connectors.

From here you can ask ChatGPT, in natural language, to run any of the LegalTech legal actors. For example:
> **Use the legaltech/fiscalia actor and find Circulares on immigration**
> **Use the legaltech/cendoj actor and give me the latest Supreme Court rulings on mortgage expenses**
> **Use the legaltech/hacienda actor and find DGT binding rulings on cryptocurrency taxation**
ChatGPT will translate your request into the right filters for the corresponding actor, run it through Apify, and return the results ready for you to continue the conversation: ask for the full text, summaries, comparisons, or tables, just as you would with any other content in the chat.
## ⚖️ Available Legal Actors
The Apify connector gives you access to the entire LegalTech catalogue in the [Apify Store](https://apify.com/store?fpr=legaltech), including:
- [`legaltech/fiscalia`](https://apify.com/legaltech/fiscalia?fpr=legaltech) — Circulares, Instrucciones and Consultas from the Spanish State Prosecutor Office.
- [`legaltech/cendoj`](https://apify.com/legaltech/cendoj?fpr=legaltech) — CENDOJ rulings, filterable by subject matter and court.
- [`legaltech/hacienda`](https://apify.com/legaltech/hacienda?fpr=legaltech) — tax administrative doctrine from the TEAC, the DGT, and the TEAR.
If you want to see concrete prompt examples and the kind of analysis you can ask the AI to do on each source, check the full step-by-step guides on [Fiscalía](https://www.legaltechnologybootcamp.com/en/blog/claude-apify-mcp-fiscalia/), [CENDOJ](https://www.legaltechnologybootcamp.com/en/blog/claude-code-cendoj-sentencias/), and [Hacienda](https://www.legaltechnologybootcamp.com/en/blog/claude-code-apify-mcp-hacienda/). They're written with Claude in mind, but the same prompts work just as well once you have Apify connected to ChatGPT.
Published on Tue Aug 11 2026 00:00:00 GMT+0000 (Coordinated Universal Time) by Miguel Gonzalez Herrera
If you already use Claude with the Apify MCP to query doctrine and case law from the chat, this guide is the version for those who prefer working from ChatGPT. In a few steps you’ll enable Developer Mode, add Apify as a connector, and be able to use the LegalTech legal actors (legaltech/fiscalia, legaltech/cendoj, legaltech/hacienda…) directly from the conversation, simply by typing @Apify.
🧩 What Is the Apify MCP and Why Connect It to ChatGPT?
The Model Context Protocol (MCP) lets an assistant like ChatGPT connect to external tools and run them for you during the conversation. By adding the Apify MCP as a connector, ChatGPT gains access to the entire LegalTech actor catalogue: instead of filling in forms and filters on official search engines, you simply ask ChatGPT in natural language for what you need, and it runs the search for you.
Let’s go step by step.
Step 1: Enable Developer Mode
Custom connectors in ChatGPT (such as the Apify MCP) live behind a setting called Developer Mode, intended for connectors that have not yet been verified by OpenAI.
⚠️ ChatGPT flags this setting as “high risk” because it allows you to add connectors that OpenAI hasn’t verified. The Apify MCP (https://mcp.apify.com/?tools=actors,docs,runs,storage,tasks,legaltech/cendoj,legaltech/hacienda,legaltech/tribunal-constitucional,legaltech/tjue,legaltech/fiscalia,legaltech/catastro,legaltech/ine,legaltech/aepd) is Apify’s official connector, so you can enable it with confidence for this use case.
Step 3: Create Your Apify Account Before Signing In
When you click Create, ChatGPT will ask you to authorize the connection with Apify via OAuth. If you don’t have an Apify account yet, this is the moment to create one — do it before clicking “Sign in with Apify” in the ChatGPT window, using the button below:
Apify’s free plan includes enough monthly usage credits to run the LegalTech legal actors. Once your account is created, go back to the ChatGPT window and click Sign in with Apify to authorize the connection with the account you just registered.
ChatGPT will show you the permissions you’re about to grant — essentially, that Apify can run actors and return results inside your conversation. Accept to complete the connection.
Step 4: Use Apify from the Chat with @Apify
With the connector set up, open a new conversation, type @, and select Apify from the list of connectors.
From here you can ask ChatGPT, in natural language, to run any of the LegalTech legal actors. For example:
Use the legaltech/fiscalia actor and find Circulares on immigration
Use the legaltech/cendoj actor and give me the latest Supreme Court rulings on mortgage expenses
Use the legaltech/hacienda actor and find DGT binding rulings on cryptocurrency taxation
ChatGPT will translate your request into the right filters for the corresponding actor, run it through Apify, and return the results ready for you to continue the conversation: ask for the full text, summaries, comparisons, or tables, just as you would with any other content in the chat.
⚖️ Available Legal Actors
The Apify connector gives you access to the entire LegalTech catalogue in the Apify Store, including:
legaltech/fiscalia — Circulares, Instrucciones and Consultas from the Spanish State Prosecutor Office.
legaltech/cendoj — CENDOJ rulings, filterable by subject matter and court.
legaltech/hacienda — tax administrative doctrine from the TEAC, the DGT, and the TEAR.
If you want to see concrete prompt examples and the kind of analysis you can ask the AI to do on each source, check the full step-by-step guides on Fiscalía, CENDOJ, and Hacienda. They’re written with Claude in mind, but the same prompts work just as well once you have Apify connected to ChatGPT.
How to Use the Apify MCP with a Local Model (Ollama) to Search CENDOJ Rulings
Learn how to search Spanish CENDOJ rulings in natural language with a language model that runs on your own computer: Ollama, AnythingLLM and the Apify MCP, without sending your conversations or documents to Claude or ChatGPT.
How to Use the Apify MCP in Claude to Find Which Cadastral Parcel You Are In and Look Up Its Data
Learn how to connect the Apify MCP to Claude and use the legaltech/catastro actor to get a parcel's cadastral reference from your coordinates or an address, and look up its official data without going through the Spanish Cadastre website.
How to Use the Apify MCP in Claude to Cross-Reference Spanish Mortgage and Foreclosure Data from the INE
Learn how to connect the Apify MCP to Claude and use the legaltech/ine actor to cross-reference Spain’s Mortgage Statistics and Mortgage Foreclosure Statistics from the INE, and reach the provincial figure no article publishes.
How to Use the Apify MCP in ChatGPT to Access LegalTech Legal Connectors
Learn how to use LegalTech legal connectors from a free ChatGPT account: enable Developer Mode, add the Apify MCP (@Apify), and query Fiscalía, CENDOJ, Hacienda, Property Registry, and more directly from the chat.
How to Use the Apify MCP in Claude to Query Doctrine from the Spanish State Prosecutor Office
Learn how to connect the Apify MCP to Claude and use the legaltech/fiscalia actor to search Circulares, Instrucciones and Consultas from the Spanish State Prosecutor Office directly from the chat, simply by asking in natural language.
How to Use the Apify MCP in Claude to Query Spanish Tax Authority Administrative Doctrine
Learn how to connect the Apify MCP to Claude and use the legaltech/hacienda actor to query TEAC tax administrative doctrine, DGT binding rulings, and historical resolutions directly from the chat.
We use Google Analytics cookies to analyze traffic and improve your experience. You can accept them, reject them, or read our Privacy & Cookies policy. Privacy & Cookies.