← Back to blog # Automate BOE Alerts for Immigration Notifications
You handle asylum and immigration cases. This system checks the BOE bulletin board daily and alerts you if a notification appears for your client, preventing deadline losses due to missed appearances.
## 🤖 Tutorial: Create Automated Immigration Notification Alerts in the BOE
For a lawyer specialising in immigration, monitoring notifications in Spain's Official State Gazette (BOE) — specifically its public notice board (Tablón Edictal Único, TEU) — is essential. The Office of Asylum and Refuge (OAR) has recently started publishing International Protection resolutions in the BOE when the interested parties cannot be located at their address.
This is critical, because **the publication date of the resolution in the BOE is the date from which deadlines begin to run** for filing an appeal against a negative decision. A missed notification can lead to the expiry of the case due to non-appearance and the loss of your client's rights. Manually checking the BOE every day is time-consuming and error-prone.
In this guide, you will learn how to build an automated monitoring system. This workflow will check the BOE daily for Immigration notifications linked to your clients' NIE numbers or names, and send you an immediate email alert.
We will use two powerful tools:
* **Apify**: To run an actor that extracts data from the BOE.
* **Make.com**: To orchestrate the workflow, read data from a Google Spreadsheet, and send notifications.
By the end, you will have an automated system that lets you act on time, avoid missed deadlines, and offer a safer, more efficient service to your clients.
### **Step 1: Prerequisites**
Before starting, make sure you have:
1. **An Apify account**: If you do not have one yet, sign up using the button below. The free plan is sufficient, as it provides monthly usage credits to run the actor.
<br>
<a href="https://console.apify.com/sign-up?fpr=legaltech" target="_blank" rel="noopener noreferrer" style="display: inline-block; padding: 10px 20px; font-size: 16px; font-weight: bold; text-align: center; text-decoration: none; color: #ffffff; background-color: #6B46C1; border-radius: 8px;">
Create a free Apify account
</a>
<br>
2. **A Make.com account**: If you do not have one yet, sign up using the button below. You can also use it for free with the 1,000 operations/month included in the Free plan.
<br>
<a href="https://www.make.com/en/register?pc=legaltech" target="_blank" rel="noopener noreferrer" style="display: inline-block; padding: 10px 20px; font-size: 16px; font-weight: bold; text-align: center; text-decoration: none; color: #ffffff; background-color: #6B46C1; border-radius: 8px;">
Create a free Make.com account
</a>
<br>
### **Step 2: Set Up the Scenario in Make.com**
To make things easier, you can clone a pre-configured scenario from the following link:
<a href="https://eu1.make.com/public/shared-scenario/pBFj7xN3ymO/extranjeria-notificaciones" target="_blank">https://eu1.make.com/public/shared-scenario/pBFj7xN3ymO/extranjeria-notificaciones</a>
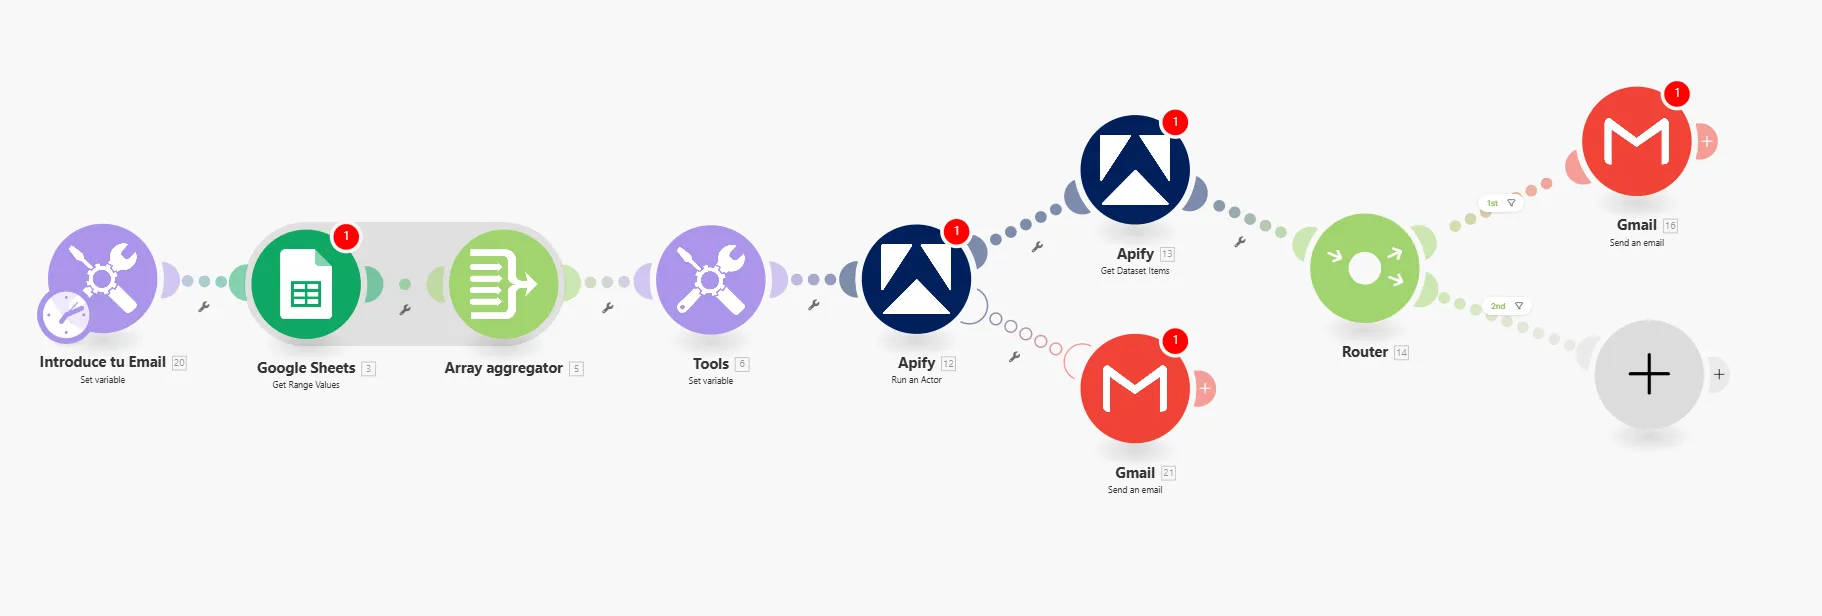
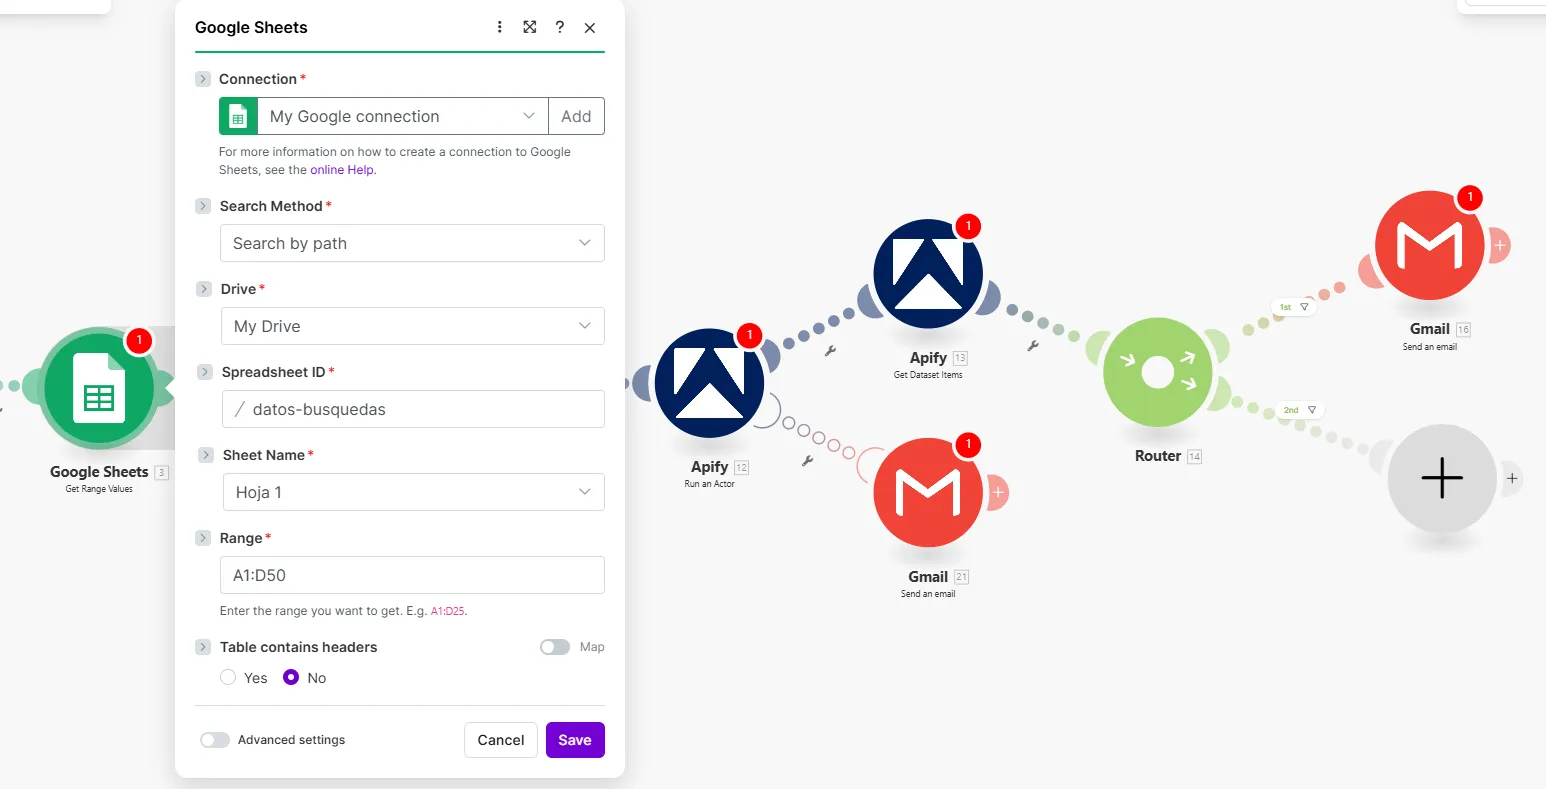
The complete workflow looks like this:

Below is the configuration for each part.
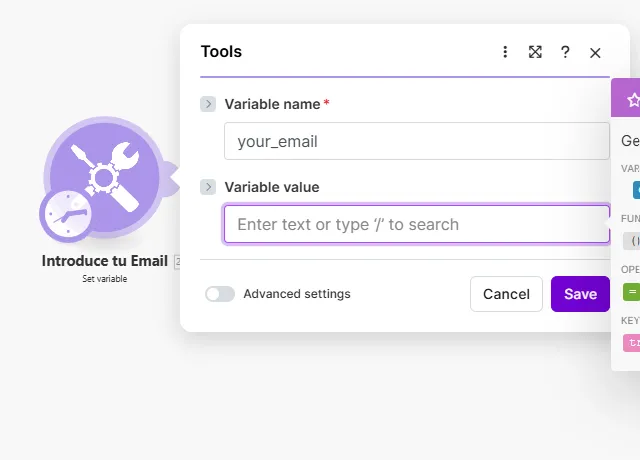
#### 1. Add the email where you want to receive notifications. Connect Google Drive and Google Sheets
Add the email address where you want to receive notifications.

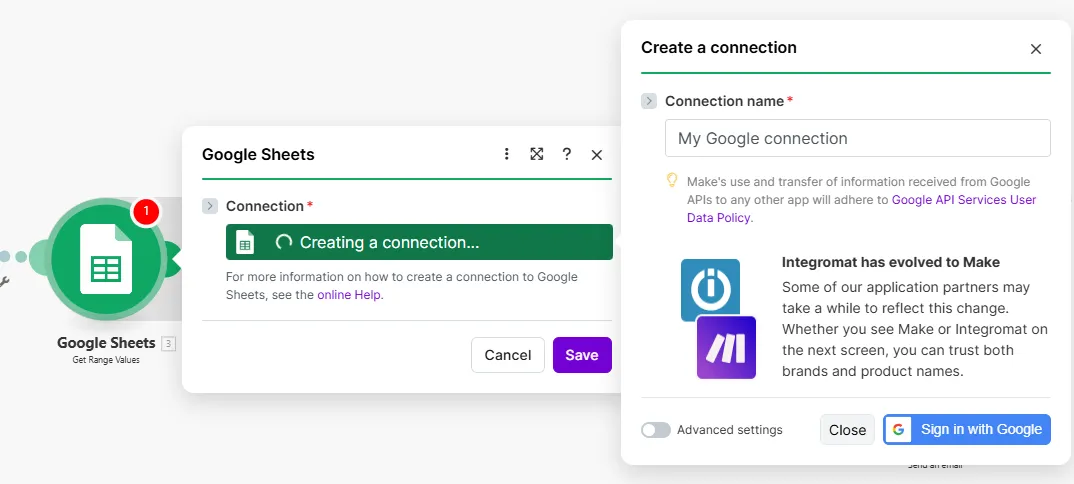
The next step is to connect your Google Drive account to read the search terms from a Google Spreadsheet.
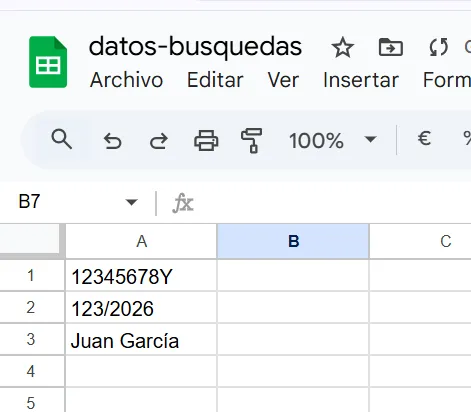
1. Create a Google Spreadsheet in your Google Drive with a column for the search terms.

2. In the Google Drive module in Make, connect your account and select the file and sheet you just created.


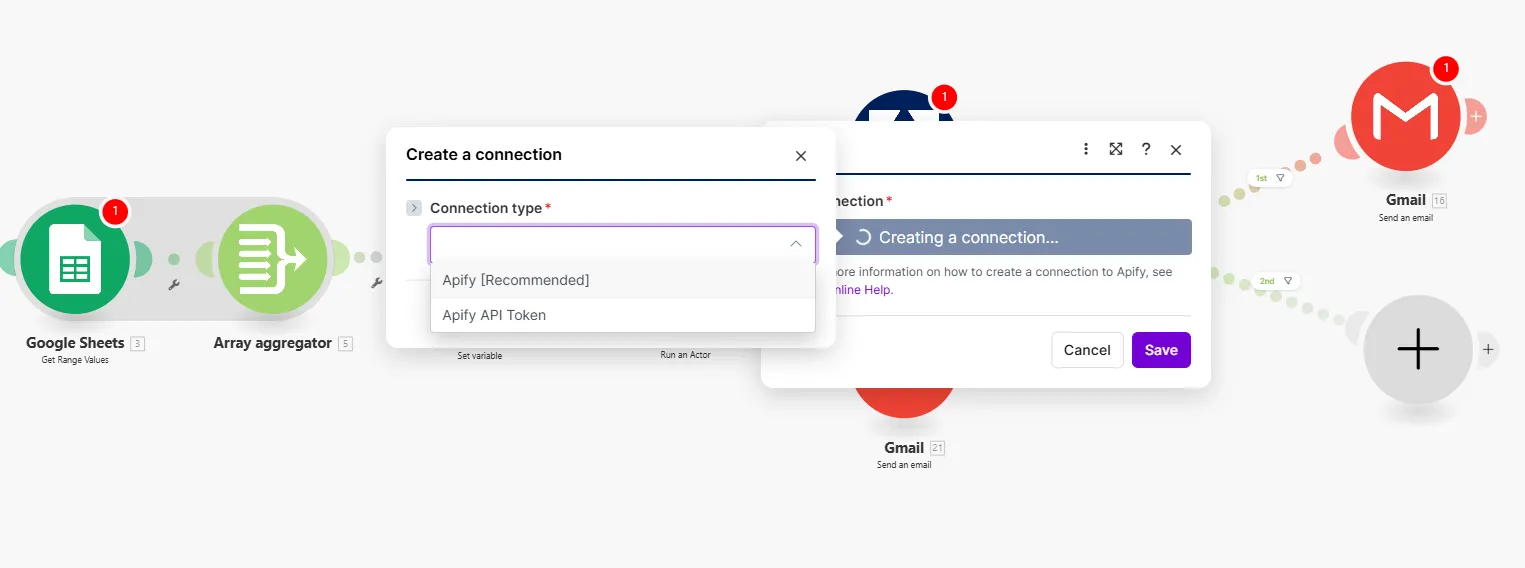
#### 2. Connect Apify
Now we will connect Apify to search for notifications.
1. **Connect Apify**: Select the Apify module (Run an Actor) and connect your account using the recommended option.

2. **Run an Actor**: After connecting, the actor we are going to use will be pre-loaded. Save it and move to the next step.
3. **Get the results (`Get dataset items`)**: Select the next Apify module to retrieve the results (the "dataset") from the actor run.
#### 3. Connect Gmail
Finally, if results are found, we will send an email.
1. Select the Gmail module and connect your account.
2. You will see the email you set at the beginning of the workflow in the `your_email` variable. Notifications will arrive there whenever a BOE announcement contains any of your search terms.
### **Step 3: How to Test the Workflow in Make**
1. **Find a real notification**: Go to the latest BOE announcements for Immigration notifications and find one published today.
<a href="https://www.boe.es/notificaciones/notificaciones.php?campo%5B0%5D=DOC&dato%5B0%5D=&operador%5B0%5D=and&campo%5B1%5D=DEM&dato%5B1%5D=&operador%5B1%5D=and&campo%5B2%5D=MATERIA&dato%5B2%5D=17&operador%5B2%5D=and&campo%5B3%5D=NBO&dato%5B3%5D=&operador%5B4%5D=and&campo%5B4%5D=FPU&dato%5B4%5D%5B0%5D=&dato%5B4%5D%5B1%5D=&page_hits=50&sort_field%5B0%5D=FPU&sort_order%5B0%5D=desc&sort_field%5B1%5D=id&sort_order%5B1%5D=asc&accion=Buscar" target="_blank" rel="noopener noreferrer" style="display: inline-block; padding: 10px 20px; font-size: 16px; font-weight: bold; text-align: center; text-decoration: none; color: #ffffff; background-color: #6B46C1; border-radius: 8px;">
Latest Immigration notifications in BOE
</a>
2. **Copy an identifier**: Copy a NIE, case number, or name that appears in a recent notification.
3. **Add it to your Google Spreadsheet**: Paste the term into your Google Sheets file in the appropriate column. You can add multiple search terms, one per row.
4. **Run the workflow**: In Make.com, click "Run once".
If the term appears in any notification that day, you will receive an email at the address you configured.
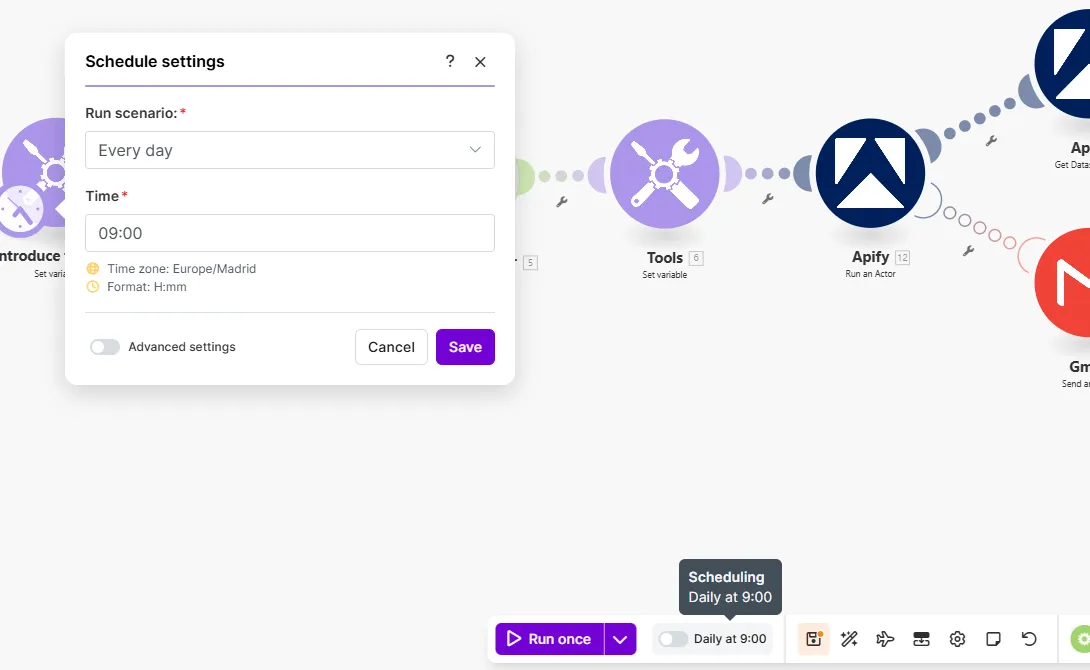
### **Step 4: Schedule the Workflow**
The last step is to automate the execution so you do not have to do it manually.
1. In Make.com, activate the scenario.
2. Set up the schedule to run every day at a specific time — for example, at 9:00 AM.

That is it! From now on, you will have an automated monitoring system for Immigration notifications in the BOE, ensuring you never miss an important deadline for your clients.
Published on Thu Jan 15 2026 00:00:00 GMT+0000 (Coordinated Universal Time) by Miguel Gonzalez Herrera
🤖 Tutorial: Create Automated Immigration Notification Alerts in the BOE
For a lawyer specialising in immigration, monitoring notifications in Spain’s Official State Gazette (BOE) — specifically its public notice board (Tablón Edictal Único, TEU) — is essential. The Office of Asylum and Refuge (OAR) has recently started publishing International Protection resolutions in the BOE when the interested parties cannot be located at their address.
This is critical, because the publication date of the resolution in the BOE is the date from which deadlines begin to run for filing an appeal against a negative decision. A missed notification can lead to the expiry of the case due to non-appearance and the loss of your client’s rights. Manually checking the BOE every day is time-consuming and error-prone.
In this guide, you will learn how to build an automated monitoring system. This workflow will check the BOE daily for Immigration notifications linked to your clients’ NIE numbers or names, and send you an immediate email alert.
We will use two powerful tools:
Apify: To run an actor that extracts data from the BOE.
Make.com: To orchestrate the workflow, read data from a Google Spreadsheet, and send notifications.
By the end, you will have an automated system that lets you act on time, avoid missed deadlines, and offer a safer, more efficient service to your clients.
Step 1: Prerequisites
Before starting, make sure you have:
An Apify account: If you do not have one yet, sign up using the button below. The free plan is sufficient, as it provides monthly usage credits to run the actor.
A Make.com account: If you do not have one yet, sign up using the button below. You can also use it for free with the 1,000 operations/month included in the Free plan.
1. Add the email where you want to receive notifications. Connect Google Drive and Google Sheets
Add the email address where you want to receive notifications.
The next step is to connect your Google Drive account to read the search terms from a Google Spreadsheet.
Create a Google Spreadsheet in your Google Drive with a column for the search terms.
In the Google Drive module in Make, connect your account and select the file and sheet you just created.
2. Connect Apify
Now we will connect Apify to search for notifications.
Connect Apify: Select the Apify module (Run an Actor) and connect your account using the recommended option.
Run an Actor: After connecting, the actor we are going to use will be pre-loaded. Save it and move to the next step.
Get the results (Get dataset items): Select the next Apify module to retrieve the results (the “dataset”) from the actor run.
3. Connect Gmail
Finally, if results are found, we will send an email.
Select the Gmail module and connect your account.
You will see the email you set at the beginning of the workflow in the your_email variable. Notifications will arrive there whenever a BOE announcement contains any of your search terms.
Step 3: How to Test the Workflow in Make
Find a real notification: Go to the latest BOE announcements for Immigration notifications and find one published today.
Copy an identifier: Copy a NIE, case number, or name that appears in a recent notification.
Add it to your Google Spreadsheet: Paste the term into your Google Sheets file in the appropriate column. You can add multiple search terms, one per row.
Run the workflow: In Make.com, click “Run once”.
If the term appears in any notification that day, you will receive an email at the address you configured.
Step 4: Schedule the Workflow
The last step is to automate the execution so you do not have to do it manually.
In Make.com, activate the scenario.
Set up the schedule to run every day at a specific time — for example, at 9:00 AM.
That is it! From now on, you will have an automated monitoring system for Immigration notifications in the BOE, ensuring you never miss an important deadline for your clients.
How to Use the Apify MCP with a Local Model (Ollama) to Search CENDOJ Rulings
Learn how to search Spanish CENDOJ rulings in natural language with a language model that runs on your own computer: Ollama, AnythingLLM and the Apify MCP, without sending your conversations or documents to Claude or ChatGPT.
How to Use the Apify MCP in Claude to Find Which Cadastral Parcel You Are In and Look Up Its Data
Learn how to connect the Apify MCP to Claude and use the legaltech/catastro actor to get a parcel's cadastral reference from your coordinates or an address, and look up its official data without going through the Spanish Cadastre website.
How to Use the Apify MCP in Claude to Cross-Reference Spanish Mortgage and Foreclosure Data from the INE
Learn how to connect the Apify MCP to Claude and use the legaltech/ine actor to cross-reference Spain’s Mortgage Statistics and Mortgage Foreclosure Statistics from the INE, and reach the provincial figure no article publishes.
How to Use the Apify MCP in ChatGPT to Access LegalTech Legal Connectors
Learn how to use LegalTech legal connectors from a free ChatGPT account: enable Developer Mode, add the Apify MCP (@Apify), and query Fiscalía, CENDOJ, Hacienda, Property Registry, and more directly from the chat.
How to Use the Apify MCP in Claude to Query Doctrine from the Spanish State Prosecutor Office
Learn how to connect the Apify MCP to Claude and use the legaltech/fiscalia actor to search Circulares, Instrucciones and Consultas from the Spanish State Prosecutor Office directly from the chat, simply by asking in natural language.
How to Use the Apify MCP in Claude to Query Spanish Tax Authority Administrative Doctrine
Learn how to connect the Apify MCP to Claude and use the legaltech/hacienda actor to query TEAC tax administrative doctrine, DGT binding rulings, and historical resolutions directly from the chat.
We use Google Analytics cookies to analyze traffic and improve your experience. You can accept them, reject them, or read our Privacy & Cookies policy. Privacy & Cookies.