
How to install the Apify connector
Last updated: October 6, 2026 · Miguel Gonzalez Herrera
The Apify MCP is the same for both assistants and is linked to your account, not to the device: once you authorize it a single time with OAuth, it works the same way in the browser and in the mobile app. The only thing that changes is where you add the connector. Pick your assistant below and follow only that guide — without touching a single API token.
If you'd rather not depend on Claude or ChatGPT, there is also an experimental guide for using the connectors with a local model (Ollama + AnythingLLM). It works, but it gets things right far less often: only pick it if you want to try it out.
Which assistant are you using?
0️⃣ First of all: create your Apify account
Order matters, and this applies to both assistants. The Apify connector is authorized with OAuth: when you tap "Connect" inside Claude or ChatGPT, a window will open for you to sign in to Apify. If you already have an account created and an active session in your browser, that window recognizes it automatically and you only have to tap "Authorize" — no need to fill out the sign-up form halfway through the connection process.
Create it now, before you start, on the free plan: it includes enough monthly usage credits to try out the LegalTech actors.
With the local model there is no OAuth: instead of authorizing the connector you will use your personal Apify token (you'll see it in step 3 of that guide). You still need the account.
1️⃣ Step 1: Download the Claude app
If you don't have it installed yet, download it directly from your phone's store:
- iOS: App Store
- Android: Google Play
If you are reading this on a computer, you can also go to claude.com/download and pick your phone from there.
Open the app and sign in with your Claude account (or create one if you don't have it).
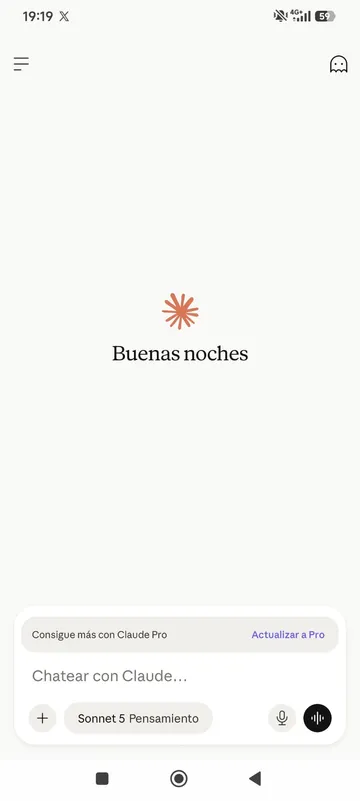
2️⃣ Step 2: Open the chat and tap "+"
From the main chat screen, tap the + icon next to the text box to see the options you can add to the conversation.
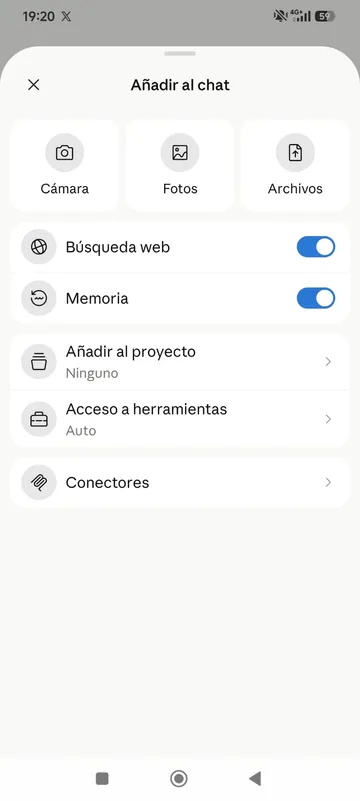
Tap Connectors.
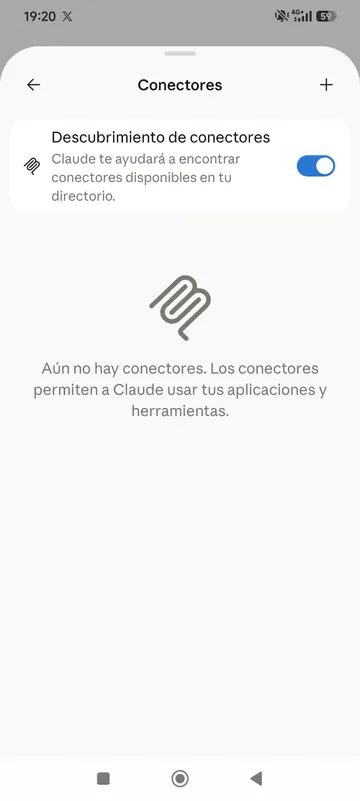
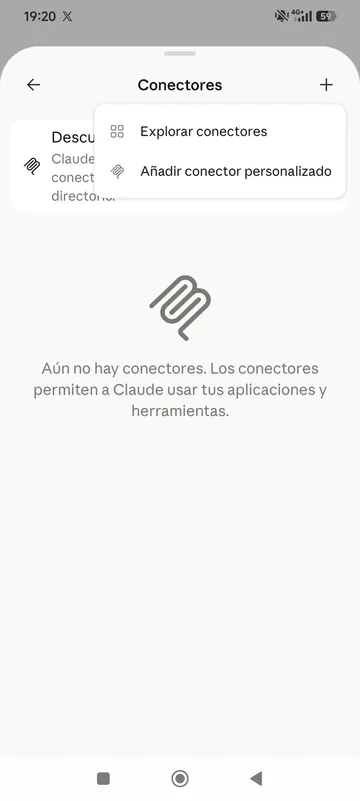
3️⃣ Step 3: Go into Connectors and tap "+" to add a new one
The first time you enter, the list of connectors is empty. Tap the + icon in the top-right corner and select Add custom connector (not "Browse connectors", which is the directory of already-published connectors).
4️⃣ Step 4: Fill in the custom connector with Apify's details
A form opens. Fill it in exactly like this (copy each value with its button and paste it into the matching field):
Name
Apify Apify MCP server URL
https://mcp.apify.com/?tools=actors,docs,runs,storage,tasks,legaltech/cendoj,legaltech/hacienda,legaltech/tribunal-constitucional,legaltech/tjue,legaltech/fiscalia,legaltech/catastro,legaltech/ine,legaltech/aepd https://mcp.apify.com/?tools=actors,docs,runs,storage,tasks,legaltech/cendoj,legaltech/hacienda,legaltech/tribunal-constitucional,legaltech/tjue,legaltech/fiscalia,legaltech/catastro,legaltech/ine,legaltech/aepd - Requires authentication: leave it enabled — this is what tells Claude that this server uses OAuth.
- OAuth client ID: leave it blank, it is optional and the Apify connector does not need it.
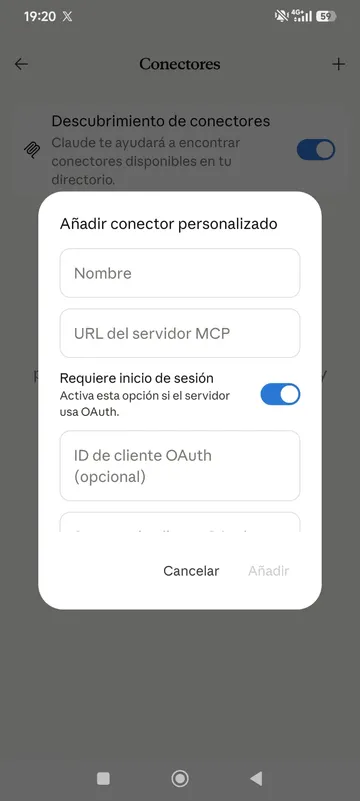
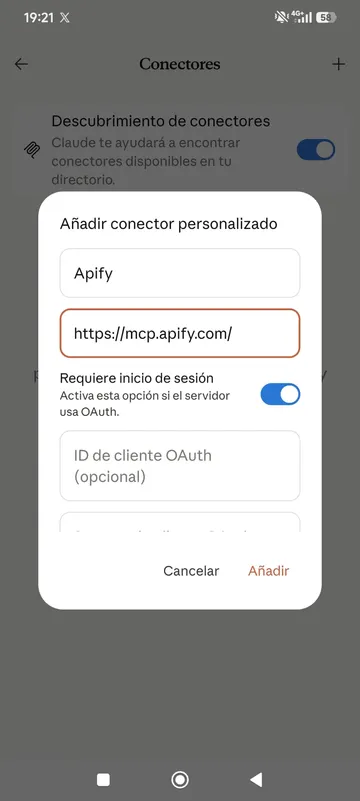
Tap Add.
5️⃣ Step 5: Connect your Apify account
Claude adds the connector to your list and will ask you to authorize it. Tap Connect: it will redirect you to the Apify account you created in step 0. Just tap Authorize and you'll return to Claude. If you hadn't registered yet, this is the moment when the authorization window will prompt you to.
✅ You're connected!
The Apify connector is enabled by default in your conversations, so there's nothing else to do. From here you have access to the LegalTech connectors — carry on with the example prompts below to try it out.
1️⃣ Step 1: Turn on Developer Mode
ChatGPT's custom connectors (like the Apify MCP) live behind an option called Developer Mode, meant for connectors that are not yet verified by OpenAI.
Go to Settings → Connectors → Advanced → Developer mode and flip the switch.
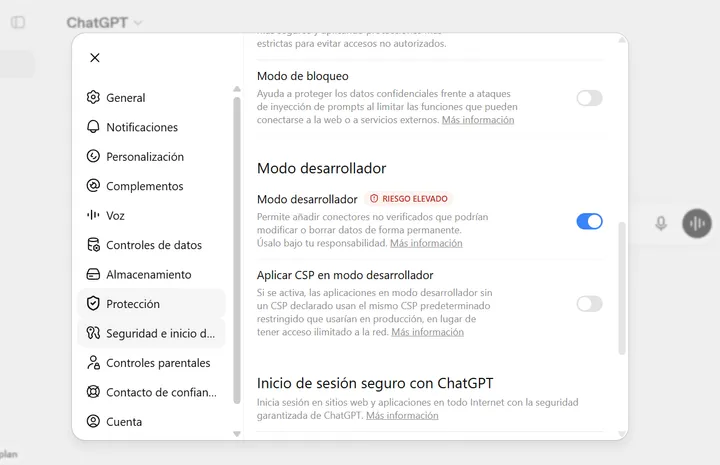
⚠️ ChatGPT flags this option as "high risk" because it lets you add connectors that are not verified by OpenAI. The Apify MCP is Apify's official connector, so you can enable it with confidence for this use.
2️⃣ Step 2: Create the Apify connector
With Developer Mode on, go to Connectors → Create and fill in the form with these values (copy each one with its button and paste it into the matching field):
Name
Apify Apify MCP Server URL
https://mcp.apify.com/?tools=actors,docs,runs,storage,tasks,legaltech/cendoj,legaltech/hacienda,legaltech/tribunal-constitucional,legaltech/tjue,legaltech/fiscalia,legaltech/catastro,legaltech/ine,legaltech/aepd https://mcp.apify.com/?tools=actors,docs,runs,storage,tasks,legaltech/cendoj,legaltech/hacienda,legaltech/tribunal-constitucional,legaltech/tjue,legaltech/fiscalia,legaltech/catastro,legaltech/ine,legaltech/aepd - Authentication: choose OAuth — this is what tells ChatGPT that this server will ask you to sign in to Apify.
- Client ID and secret: leave them blank, the Apify connector does not need them.
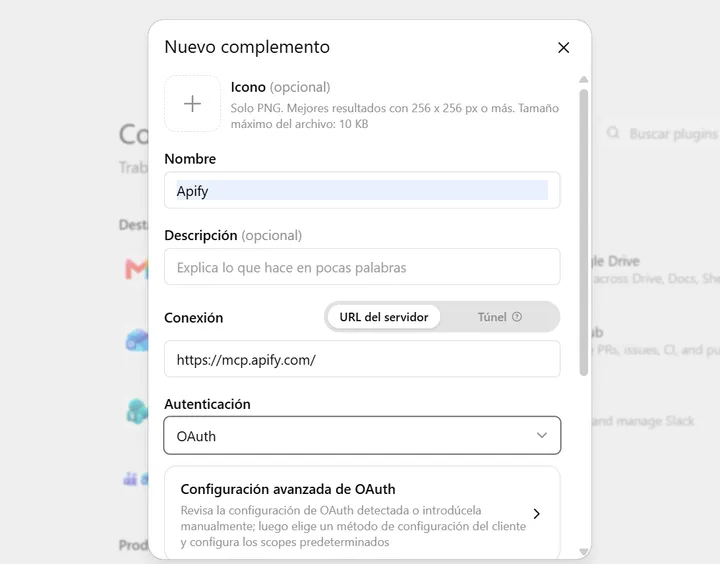
Click Create.
3️⃣ Step 3: Connect with OAuth
When you click Create, ChatGPT opens the Apify authorization window. If you followed step 0 and are already signed in, you just have to click Sign in with Apify and accept the permissions — essentially, letting Apify run actors and return results inside your conversation. If you hadn't registered yet, this is the moment when the window will prompt you to.
Once authorized, the connector is linked to your ChatGPT account: you'll also have it available in the ChatGPT mobile app, without repeating the setup.
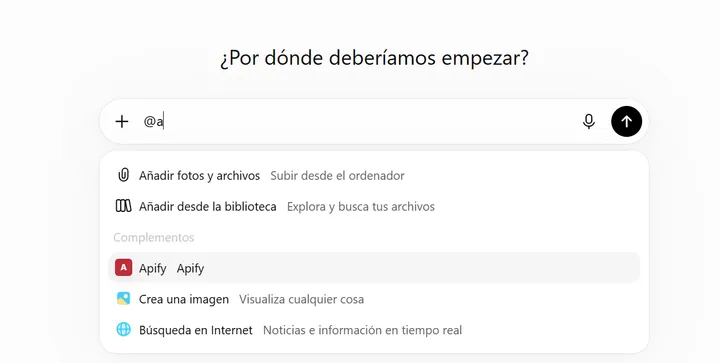
4️⃣ Step 4: Use Apify in the chat with @Apify
Open a new conversation, type @ and pick Apify from the list of
connectors. From there you have access to the LegalTech connectors — carry on with the
example prompts below to try it out.
If you want the long version of this guide, with more context on Developer Mode, it is in this blog post.
⚠️ Experimental guide
This setup works, but it is a proof of concept. A small local model such as gemma4:e4b uses tools worse than Claude or ChatGPT: it
sometimes picks the wrong tool, fills in the parameters incorrectly or makes up part of the
answer. Always verify the rulings against the original source before using
them.
In return you get:
- Privacy: the model runs on your computer. Your prompts, documents and conversations are not sent to OpenAI or Anthropic.
- Cost: no Claude or ChatGPT subscription or tokens to pay for. At most, you pay for your Apify usage.
🧩 What we are building
You ──► AnythingLLM (chat and agent) ──► Ollama + gemma4:e4b (local)
             │
└──► Apify MCP (cloud) ──► legaltech/cendoj ──► CENDOJ- Ollama runs the language model on your machine.
- AnythingLLM is the chat app. It acts as the "agent" and is the one that calls the tools.
- Apify MCP is the connector that gives access to the LegalTech actors (CENDOJ, Constitutional Court, CJEU, INE, Cadastre…).
ℹ️ What leaves your computer: your conversations and any documents you share in the chat stay on your machine. The only thing that leaves is the search terms the agent sends to Apify and the public source (CENDOJ, for example); the results are public court rulings. So don't put personal or confidential data in the search itself. That is exactly the difference with Claude or ChatGPT: there, if you paste a contract or a claim, that text is sent to the model.
Hardware requirements
- RAM: 16 GB minimum; 32 GB recommended.
- Processor / GPU: Apple Silicon (M1 or later) or an NVIDIA GPU with 8 GB of VRAM at minimum; Apple M2/M3/M4 Pro or NVIDIA with 12 GB or more recommended.
- Free disk space: 15 GB minimum; 30 GB or more if you want to try other models.
- OS: macOS 13+, Windows 10/11 or Linux.
The gemma4:e4b model is about a 9.6 GB download (a bit more in
memory, depending on the context window); AnythingLLM takes around 1–2 GB and Ollama around
1 GB. Without a GPU (CPU only) it works, but very slowly: it can take minutes per answer.
1️⃣ Step 1: Install Ollama and the model
This is the only step where you need the terminal. It can feel daunting if you have never opened it, but it is simple: you just copy and paste one command. If you get stuck or have any question, write to us at legaltechnologybootcamp@gmail.com.
- Download and install Ollama from ollama.com/download.
-
Open the terminal: a window where you type commands instead of clicking
buttons. You will only use it in this step.
- Mac: press Cmd + Space, type Terminal and press Enter.
- Windows: press the Windows key, type Terminal (or PowerShell) and press Enter.
-
Copy this command, paste it into the terminal and press Enter. It downloads the
model (about 10 GB, it may take a while):
ollama pull gemma4:e4b -
Check that it supports tools.
toolsmust appear in the output of this command:ollama show gemma4:e4b -
Quick test (exit with
/bye):ollama run gemma4:e4b "Hi, answer in one sentence"
🎉 Congratulations! You now have a language model running on your own computer. It doesn't depend on any company or on an internet connection: only on your machine.
2️⃣ Step 2: Install and configure AnythingLLM
Ollama runs from the terminal. AnythingLLM puts a chat window on top of it, so day to day you use it just like ChatGPT or Claude: you type, attach documents and read the answers, without opening the terminal again.
- Download AnythingLLM Desktop from anythingllm.com/download and install it.
-
Go to Settings → AI Providers → LLM:
- Provider:
Ollama - Base URL:
http://127.0.0.1:11434(usually detected automatically) - Model:
gemma4:e4b
- Provider:
-
Create a workspace (for example,
legaltech). In its settings, under Agent Configuration, also select Ollama andgemma4:e4bas the agent model.
3️⃣ Step 3: Copy your Apify token
-
With the account from step 0 already created, go to
Apify Console → Settings → API & Integrations
and copy your Personal API token (it starts with
apify_api_...). - 🔐 Treat it like a password: don't share it or push it to repositories, cover it if you take screenshots of the configuration file and, if it leaks, revoke it and create a new one from the same screen.
4️⃣ Step 4: Set up the Apify MCP connector in AnythingLLM
- In AnythingLLM, go to Settings → Agent Skills → MCP Servers and click the book icon. A text file with the configuration opens.
-
Delete whatever it contains and paste this (use the Copy configuration button).
Then replace
YOUR_APIFY_TOKENwith your token from step 3, keeping the wordBearerand a space in front. Save the file.
{
  "mcpServers": {
    "apify": {
      "type": "streamable",
      "url": "https://mcp.apify.com/?tools=actors,docs,runs,storage,tasks,legaltech/cendoj,legaltech/hacienda,legaltech/tribunal-constitucional,legaltech/tjue,legaltech/fiscalia,legaltech/catastro,legaltech/ine,legaltech/aepd",
      "headers": {
        "Authorization": "Bearer YOUR_APIFY_TOKEN"
      }
    }
  }
}Go back to Settings → Agent Skills → MCP Servers and click Refresh. "Apify" should show as On, with its list of tools.
The book icon doesn't open the file?
Open it by hand with Notepad (Windows) or TextEdit (Mac). It is at:
- Mac:
~/Library/Application Support/anythingllm-desktop/storage/plugins/anythingllm_mcp_servers.json - Windows:
%APPDATA%\anythingllm-desktop\storage\plugins\anythingllm_mcp_servers.json - Linux:
~/.config/anythingllm-desktop/storage/plugins/anythingllm_mcp_servers.json
5️⃣ Step 5: Enable only the minimum tools (important!)
The Apify connector exposes about 30 tools, and each one's description is sent to the model with every message. With all of them enabled they take up about 12,000–16,000 tokens: the model has no room left to think, so it hangs or makes up tools. On top of that, a small model gets far more confused the more options it has.
In Settings → Agent Skills → MCP Servers → Apify, leave only these three enabled:
- ✅
legaltech--cendoj: search rulings and extract their text. - ✅
get-actor-run: check whether a long run has finished. - ✅
get-dataset-items: fetch the results of that run. -
❌ Everything else disabled, including
call-actor: it is redundant and its description is very long.
That leaves 3/30 tools enabled. If you want another source (Constitutional
Court, CJEU, INE…), enable only that legaltech--… tool and
disable CENDOJ: one at a time works best. Rule of thumb: the fewer tools, the more free
context and the more accurate the answers.
6️⃣ Step 6: Use it
- Open a new chat (New Thread) in your workspace.
-
Start the first message with
@agentto turn on agent mode. Later messages in the same thread stay in agent mode. -
When the agent uses the connector you'll see something like "MCP server: apify:legaltech--cendoj completed successfully". Click the
>arrow to see which parameters the model sent.
Try one of these examples (CENDOJ is a Spanish database, so the legal terms stay in Spanish):
@agent find 5 rulings on cláusula suelo @agent find 5 rulings on cláusula suelo @agent find 5 rulings on gastos hipotecarios @agent find 5 rulings on gastos hipotecarios @agent find 5 rulings on IRPH @agent find 5 rulings on IRPH @agent find 5 rulings from the social (labour) jurisdiction on despido improcedente @agent find 5 rulings from the social (labour) jurisdiction on despido improcedente ✅ Best practices
- Open a new chat every few searches. Results take up a lot of context.
- Ask for few results (5–10). To read rulings, use paragraph mode instead of the full text.
- Always verify. Look up the ROJ on poderjudicial.es or open the PDF. The model can summarise badly or mix up data.
- If the model falls short, try a bigger one with the same setup (for
example,
qwen3.6:35b-a3bif you have 32 GB of RAM or more). It is slower, but it gets the parameters right more often.
⚖️ Try it: prompts ready to copy
With the connector enabled, copy any of these prompts and paste it as-is into the chat:
💻 If you use the local model: before trying an actor, enable it in
AnythingLLM, under Settings → Agent Skills → MCP Servers → Apify. Enable its legaltech--… tool (for example, legaltech--catastro) and disable the
ones you won't use. Start your message with @agent.
Cadastral reference and parcel data from coordinates, an address or a cadastral reference (Spanish Land Registry / Catastro).
Use the actor legaltech/catastro and tell me which cadastral parcel I am on based on my location Use the actor legaltech/catastro and tell me which cadastral parcel I am on based on my location CENDOJ court rulings, filterable by subject matter and court.
Use the actor legaltech/cendoj and give me the latest Supreme Court rulings on mortgage costs Use the actor legaltech/cendoj and give me the latest Supreme Court rulings on mortgage costs Case law of the Court of Justice of the European Union (judgments, orders, opinions and requests for a preliminary ruling).
Use the actor legaltech/tjue and find me CJEU judgments on data protection Use the actor legaltech/tjue and find me CJEU judgments on data protection Circulars, Instructions and Consultations of the Spanish State Attorney General (Fiscalía General del Estado).
Use the actor legaltech/fiscalia and find me Circulars on immigration law Use the actor legaltech/fiscalia and find me Circulars on immigration law Spanish tax administrative doctrine from the TEAC, the DGT and the TEAR.
Use the actor legaltech/hacienda and find me binding rulings from the DGT on cryptocurrencies Use the actor legaltech/hacienda and find me binding rulings from the DGT on cryptocurrencies Official series and data from the Spanish National Statistics Institute (INE).
Use the actor legaltech/ine and cross-reference the Mortgage Statistics with the Mortgage Foreclosure Statistics for the last quarter Use the actor legaltech/ine and cross-reference the Mortgage Statistics with the Mortgage Foreclosure Statistics for the last quarter Decisions, reports and other documents from the search engine of the Spanish Data Protection Agency (AEPD).
Use the actor legaltech/aepd and find me enforcement decisions on video surveillance from the last two years Use the actor legaltech/aepd and find me enforcement decisions on video surveillance from the last two years legaltech/tribunal-constitucional
Case law of the Spanish Constitutional Court: judgments, orders and declarations, with their full text.
Use the actor legaltech/tribunal-constitucional and find me amparo judgments on the right to honour Use the actor legaltech/tribunal-constitucional and find me amparo judgments on the right to honour The assistant will recognize Apify as an available tool, launch the corresponding actor and return the result in the conversation itself, with a link to the official source.
For concrete prompt examples on each source, there is a full walkthrough in our dedicated articles on the Cadastre, State Attorney General, CENDOJ, Tax Administration and Land Registry. They are written with Claude in mind, but the same prompts work just as well from ChatGPT.